Wirecast Basic Steps for Doing a Facebook Live Broadcast
- Hook up all cameras, microphones, audio switcher, and audio interface
- Open Blackmagic Desktop Video Utility before opening Wirecast
- this tests that your cameras are connected and recognized
- keep it running in the background
- Each layer is a type of media (camera, still image, lower third graphic, audio interface, etc.)
- put all other media layers in first and put your cameras in last (bottom layers)
- Make sure AutoLive is off before you start broadcasting (press arrow button)
- Select Layout > Show Live and Preview to preview your shots from the Layout menu
- Have a Facebook login and a page for your broadcast set up
- Select page
- Write title and description
- Choose “Schedule for Later” and choose the time for the start of your stream (20 minutes before your event starts)
- Click “Create” to generate the URL (in “Location”), which you can share with people who want to watch the stream, or post the URL to your Facebook page
- When you press ok, your stream is ready
- Click “Go Live Now” about 20 minutes before your event starts
- When you’re ready to start, do a countdown and press the “Stream” button
- Wait a few seconds before talking so no audio gets cut out at the beginning
- Select “Output > start/stop broadcast > stop” when you’ve ended
- Make sure to have a set ending to the broadcast planned so viewers know when it’s officially over
- Quiet on the set for a couple seconds while you’re stopping the stream and then end the session
- The stream is saved to the Facebook page
Tips and Troubleshooting:
- Have someone watching the stream on their phone with headphones to make sure the livestream looks and sounds good, and also have them answer any Facebook questions that pop up on the page.
- During set-up, if one of your cameras is black, check the following:
- Check to make sure that the 1080p HDMI Output setting on the camera is switched to “OFF”.
- Touch <FUNC.> to enter the function menu
- Touch <MENU>
- Touch the <System Setup> tab
- Drag up or down to display [HDMI 1080p Output]
- Touch [ON] and select [OFF] to disable 1080P output.
- Touch the [X] to close the menu.
- NOTE: You can’t adjust this setting while the HDMI cable is plugged into the camera, so you will have to unplug the HDMI cable to adjust this setting
- Try exiting Wirecast, unplugging the camera, re-connecting the cable and restarting Wirecast
- Make sure the lens cap is not on the camera lens!
- Make sure to check that your cameras are recognized in Blackmagic Desktop Video Utility before opening Wirecast, and make sure you plug in your cameras and turn them on before opening Blackmagic Desktop Video Utility
- Check to make sure that the 1080p HDMI Output setting on the camera is switched to “OFF”.
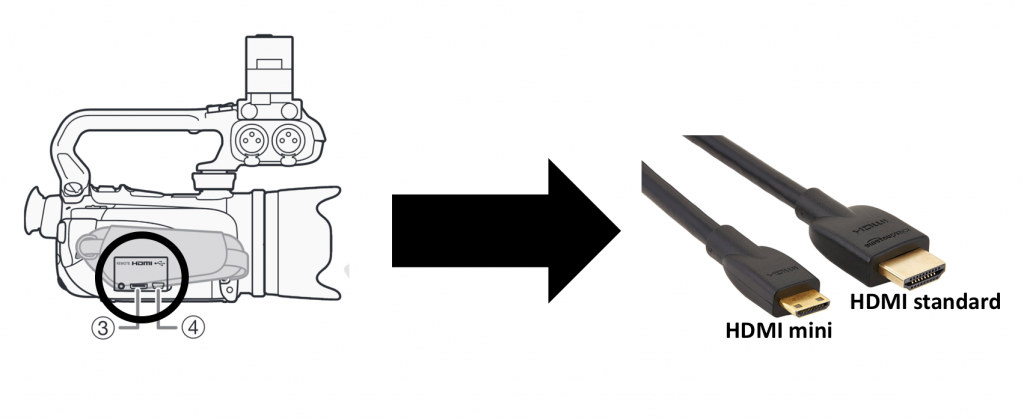
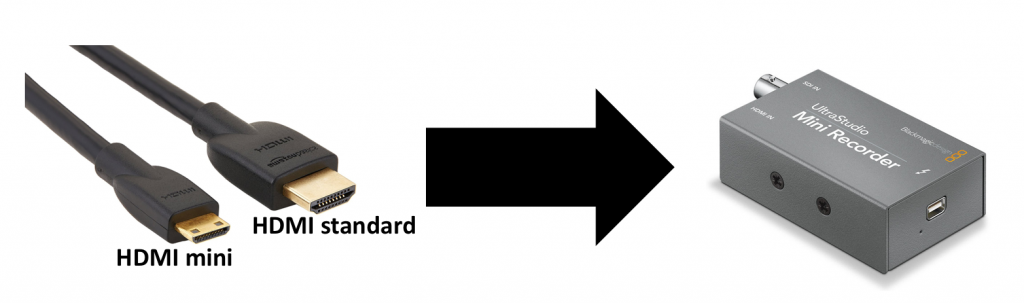
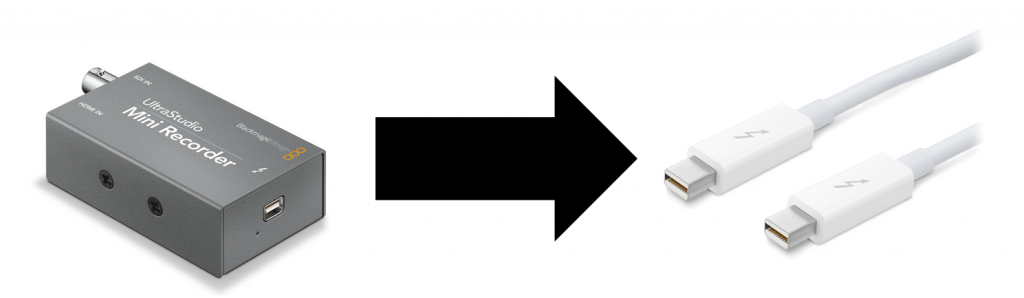
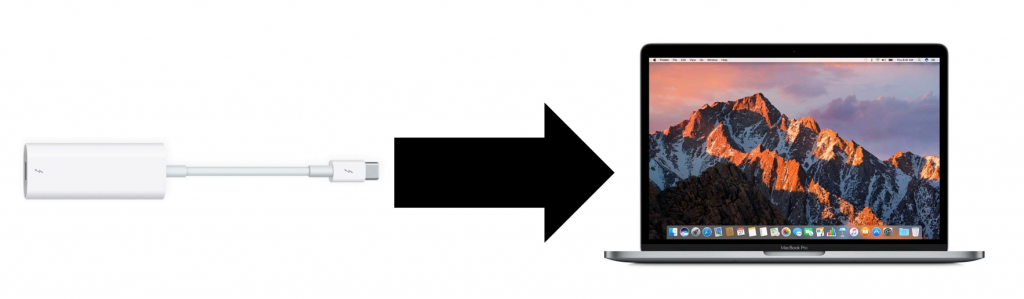
Wirecast Hardware Setup Diagram
Step 1: Plug HDMI mini into HDMI OUT port on XA10 camera
Step 2: Plug opposite end of HDMI cable into Blackmagic UltraStudio Mini Recorder
Step 3: Plug one end of thunderbolt-2 cable into other end of Mini Recorder
Step 4: Plug other end of thunderbolt-2 cable into thunderbolt-2/thunderbolt-3 adapter

Step 5: Plug thunderbolt-3 end of adapter into MacBook Pro thunderbolt-3 port
Repeat these steps for your second camera.
More Resources
- Wirecast Tutorial (shows you how to access tutorial that contains practice files to use in Wirecast software)
- Overview of Wirecast (can be used alongside the above tutorial)
- Wirecast Quick Start Video
- Working with Layers
- Streaming Live to Facebook
- Titler Live Quick Overview