Basic Recommended Setup
- The overhead lights are a different color temperature than the studio lights, and you cannot adjust their placement or brightness. You should turn them off before recording to achieve the best possible lighting for your shot.
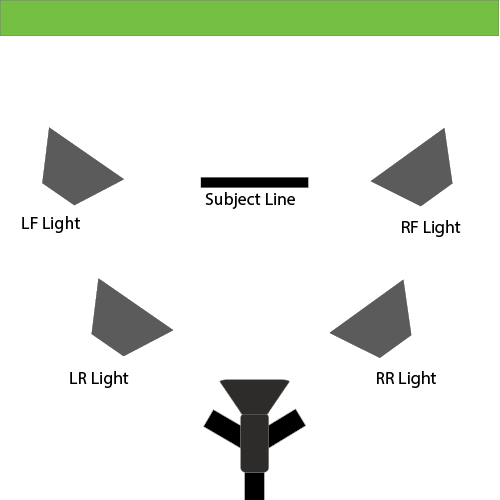
- The left and right front lights (LF and RF) light the green screen background. Turn on all three switches of the LF Light and RF Light.
- The left and right rear lights (LR and RR) light your subject. Turn on three switches on the RR Light and two switches on LR Light. The RR Light acts as the key light, or main source of light on your subject, while the LR Light acts as the fill light, which is a supplementary light used to lighten shadows.
- Position the subject at or in front of Subject Line, centered in the shot. This will reduce the amount of shadow created on the green screen. The more shadow, the harder it is to key out the background when editing.
- Record your subject.
Use this interactive presentation to test your knowledge!
To make the presentation full screen, click this icon:

Keying Your Clip in Editing Software (i.e. Adding a Custom Background)
After you’ve imported your footage into your editing program of choice follow these directions to replace the green screen:
- VideoSchoolOnline Directions for Keying in Adobe Premiere Pro
- Apple’s Directions for Keying in Final Cut Pro
- Apple’s Directions for Keying in iMovie